Pages

Tuesday, April 30, 2013

A Great Opportunity

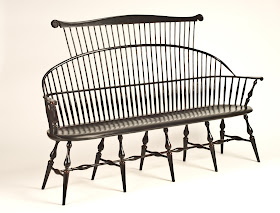
I love this chair. More than that I love the process of making this chair. I never stop seeking new opportunities to learn new processes to fine tune this craft. What attracts me to this field is not the final product but the process. This spring I will be assisting Peter Galbert in a class at Kelly Mehler's school called "Horsing Around with Tools". This will be a fantastic opportunity to learn new skills to tune tools, make tools, make a shave horse, forge your own tools, and many other things that Peter will teach you. I can't believe that there are spaces available for this class and I highly recommend you sign up. This class will change your life and the way you look at tools and chair making. There are just a few spaces left so don't miss out. Check out Kelly's web site and Peter's web site

This weekend I'll be at the TACA craft fair in Nashville. The show is at Centennial Park outside (hopefully not in the rain). Please come by and say hi. It's a great show with about 45,000 folks coming through. I'll have the new 6' settee to show among other chairs. There will be about 180 of Tennessee's finest artist to see. Don't miss it. I'll be there Friday, Saturday, and Sunday.

Wednesday, April 24, 2013

Garden Shed Update

I just returned from Indiana with the second load of timber for the garden tool shed. We got cut short from rain moving in but we made a lot of progress with only 7 rafters left to cut for the main frame.
 When cutting the floor joist I rough out the 4 x 6 timbers on the end of the log to see where to start cutting. This is so fast that it almost seems like cheating. Someday I might try to hand hew all the timbers but today this is what will happen. It also helps to justify owning a sawmill.
 Once the trailer is filled up to the rails I know it is loaded to the limit. Green oak can be very heavy. A 16 foot 8''x 8'' oak timber can weigh as much as 450 pounds.
 To date we have cut about about 8 trees for the main frame of the shed. This does not include the lumber to wrap the building or the front porch.
 This is the work horse of the operation. A 1957 Massey ferguson tractor. It always amazes me what this thing can pull.
 Bill keeps his tractor in a barn built back in 1888. I have studied the timber frame structure for long periods of time. All hand hewn timbers of oak, maple, hickory. You can tap on these timbers and they feel like marble. The barn has a date carved into it 1888 and the town of Elberfeld Indiana was founded in 1885. Bill's family bought this farm in 1957 and raised cattle.
The barn has had many changes over the years. The outside is now covered in metal. This barn is huge.

 This is the path that leads into the woods at Bill's farm. I can't even begin to tell you how much wood has been pulled down this path. The wood cut from this land has effected many lives in a positive way. We have been cutting timber from this farm for over 15 years and you can't even tell. Sadly Bill has sold the farm. It will soon be owned by Peabody Coal company. It has been a good source of wood for many woodworkers, chair makers, and timber frames. My whole shop came from this land. The Nelson farm will be missed.

Sunday, April 21, 2013

The Mighty Chestnut Once Again

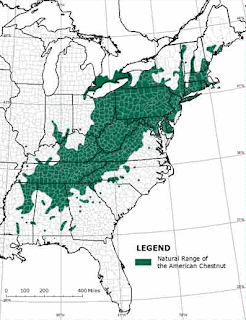
 I love trees. Wow. Really? You didn't know that? I wish I could have seen the massive trees that my great grandparents took for granted. The Mighty Chestnut had to be one of those trees. I have heard many great stories of what a great wood this tree provided. They grew to 130 feet tall and over 5 ft wide. Many had clear trunks to 50 feet. In their glory they consisted of 25% of the hardwood canopy in the eastern forest. Sadly in 1904 out of New York a fungus which came from Asia was discovered. The Chestnut blight wiped out more than 4 billion trees. They said massive trunks of dead standing chestnuts scattered the landscape. Once the fungus attacked the tree it was dead in two years.By 1950 the American Chestnut had virtually disappeared.

 Thanks to the American Chestnut Foundation many good folks are trying to bring them back. Through back cross-breeding they have attempted to create a blight free chestnut by crossing the American version with a blight resistant Chinese version. The 6th generation version of this possible blight resistant tree makes it 94% American Chestnut. In 2009 hundreds of these trees were planted in the southern forest areas in undisclosed locations to protect the tests being conducted by the American Chestnut Foundation.

Last year I was very lucky to have been given one of these blight resistant chestnuts. So here it is planted on my property. I can only hope with time and careful attention that this little guy will make it. Wouldn't it be cool to have these trees back once again in our forests for our children's children to enjoy?

If you would like more info on the wonderful efforts to bring these trees back or a way to grow your own Chestnuts contact www.acf.org


I have to end this blog entry showing a crazy egg one of my chickens laid yesterday. It barely fit in the egg carton. 
 Imagine my surprise when cracking this monster egg and two yolks popped out. My first double yolk.

Sunday, April 7, 2013

Cherry Onions-Nobody Wins

The sill plate timbers are complete. I cut the tenons on the 2 short side sills. I used the draw bore method for the peg. This is simply drilling the hole closer (1/8'') to the shoulder of the tenon so that when you peg the joint it will draw it tighter together. 

 The carpet dolly brought the timbers to the foundation of dry laid stone with ease.
 With the help from my friend Pete Wiens I had the timber pegged together in about 20 minutes.
 I am now ready to start the frame itself. One more trip to Indiana to cut and I'll have everything I need to finish the frame. After the frame is raised I can tap in more stones to tighten the foundation.
 I would like to leave you with a picture of the worst cherry log I ever cut. I receive lots of great logs whether it is from storms or someone taking out a tree near a house. On the rare occasion I will buy a log from a log yard in hopes of some really cool wood. This cherry log was suppose to be the one. I got a really good deal( I thought) . This log showed every sign of curly grain and a huge crotch section. After hours of cutting this beast on my mill I soon discovered it had wind shake so severe that it fell apart like an onion. I have never seen anything like it. Absolute junk. The log has now been discarded in pieces at the back of my lot. Be aware of cracks that go in circles along the growth rings at the end of a log. Wind shake. Lesson learned.

Tuesday, April 2, 2013

The Chain Mortiser

This morning after coffee and the usual chores that go along with owning farm animals I felt it necessary to dig out the old timber framing tools. I have 2 students coming to start a chair class tomorrow but today we will cut mortises. I have not used these tools since 2009 when I built my shop. It is good to sense their presence again. The 16'' beam saw cuts the ends nice and square. One note about any circular saw is to use paraffin wax (clear block on the timber) on the blade and the base of the saw. It will amaze you how much smoother the saw will handle. Please don't judge me about the wedge holding the guard back but it works for me. The beam saw cuts only 6'' deep so I roll the timber to complete the cut.
 The real star of the show is the chain mortiser. This tool does one thing and does it fast. Yea, I know it would be useless without 110 volts but I do have a chair business( I think) that I have to get back to. One day I would like to try hand hewing timbers and drilling and chopping the joints by hand but sometimes I just don't have time to take the back roads so I will take the interstate. This tool from Makita has held up very well. A bit pricey but still one of the cheaper models on the market.

 I started on the long sill plate. After cutting both ends square to length I lay out the mortise for the end plate tenon. It makes things cleaner to chop an outline of the mortise before using the chain mortiser. This is an aggressive tool so hold on tight.
 It leaves a nice square hole but must be cleaned up with the mortise chisel and slick. You still have to square up the bottom of the mortise.
 Everywhere there is a joint in this frame I will bring the faces down to 7''. This allows me to use timbers that are not sawn perfect. One example is this sill plate is 3/4'' bigger on one end. It's just the nature of the saw mill, wood flexing while sawing. I use a small circular saw to kerf down to make my 7''. Then I chop away excess with my carpenter axe.
 The slick and mortise chisel make quick work to clean up the joint. I really like Barr's timber frame tools. The edges really take a beating and stay sharp.
 By the end of the day I had one 16' sill plate complete. There is a lot going on in this piece. Mortises for end sills, post, and floor joist. A good start but tomorrow I'll be back in the shop teaching and rain will set in Thursday. Much more to come.

Monday, April 1, 2013

Rock

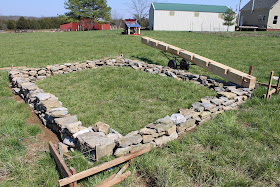
Lately all I can think about is rocks for the garden tool shed foundation. Today was a warm sunny day and it was rock stackin time. Rocks around here are rough and not always flat. But they are free and plentiful in creeks, ditches, and construction sites. They are everywhere.   

The key to a good foundation of field stone is careful layout of batter boards and mason string. The string is level to the top of the foundation and maps out the perimeter. Everything is dry stacked and small wedges of stone between the bigger rocks keep everything tight. Also the weight of the building will hold all the stones in place.
 It took a good part of the day to stack all the rocks that I had collected. I need almost as much again that I have already used. Lots of rain lately has made it impossible to collect from the local creeks so I will look elsewhere. One more day of stacking and I'll be ready to start the mortise and tenons on the white oak sill plates.
 This is "Little Mama" named from the previous owners. I love this chicken. She use to stand on my shoe when I would work in the shop. She is the only hen I have that nests her eggs. Little does she know there is no rooster and she is also sitting on a golfball. This is all she does all day. I collect the eggs daily so she still lays an egg every day. She is determined to hatch that golfball.
 Little Mama lays the cutest eggs. Notice the normal egg on the left and Little Mama's on the right. She does the best she can.