Sunday, February 24, 2013

Settee Part 4-Spindles, Spindles, Spindles

My wife is a second grade school teacher of which I look up to with the utmost respect. She has such patience with her students on a daily basis. I like to think I have lots of patience when it comes to teaching chairs but then I realize my few students really enjoy woodworking and we have fun as we make a chair. I guess if I had a room full of 8 year olds who really didn't want to be there then my patience would be tested. I did test my patience to finish fitting all 45 spindles for this settee. After a while you can get into a rhythm. I guess I passed the test. 
 Here is my set-up to ride the horse and fit each spindle to its own hole in the arm. I taper the arm holes to match the spindle. No glue on this joint just a wedged fit.
 I cannot emphasize enough about being organized here. I like to use a sharpie and number each spindle on the bottom as I finish it. I pencil numbers underneath the arm as well as the seat holes.
 Here you can see I have laid out all the spindles in order, warm water, warmed hide glue, brush and a hammer. These spindles are fresh out of the kiln. Ready for glue-up.
 I move at a steady pace and glue each spindle in its corresponding permanent home. No reason to rush but I realize my dry spindles are soaking up the humidity as I go. Some spindles have taken on some crazy bent shapes but no problem with this style settee
 Next goes on the arm which I only glue the short spindles and arm post. This is where I hope there are no thick spindles I forgot. All went well.
 Then I weave the back through the spindles and drill the back. Some last final checks of the 3/8'' spindle diameter and the arm is tapped down in place. Lots of wedges here.
 The shop as seen this afternoon after the glue-up. All I have to do now is carve a crest rail and of coarse about 4 days of painting. More patience! Stay tune for the last settee installment later this week(hopefully)
 Here is Larry after completing his rocker last week. Not bad for his first chair. Great job Larry.

Sunday, February 17, 2013

Classic Settee Part 3

Now I have the seat completely carved and ready for the undercarriage. I will finish scraping the seat after the legs have been installed. 
  Here is a shot of all the stretchers after they have been drilled and the tenoned sized on the ends. Fresh out of the kiln.
 The first operation in glue up is the stretcher assembly. So far so good.
 Everything found a place so all I have to do is saw kerfs in the leg tenons for wedges.
 And marry the legs to the seat. I hope this is a long happy marriage. Careful measurements to level everything then cut the legs to length. Looks like my workbench could have been just a bit longer.
 Here you can see I have drilled the arm to fit the arm posts. This took a little time to be sure things were right. I don't want to bend another arm.
 The arm lines up perfectly and true center came out dead center. Lucky day! Next you can see how I drill the many holes through the arm into the seat. Now I will start the very long process of sizing all the dry spindles. Won't be long now.
 My good friends Ziggy and April had to leave to go back home in Missouri today. I really enjoyed having them here and hope they learned a few things they can use back home. This is a bowl April was carving by hand to use with dough.
 I like this curved bench she made with the steam bent stretcher. This was sawn from a curved branch of a local walnut tree. Great job you two, see you down the road, stay sharp!

Wednesday, February 13, 2013

Classic Settee Part 2

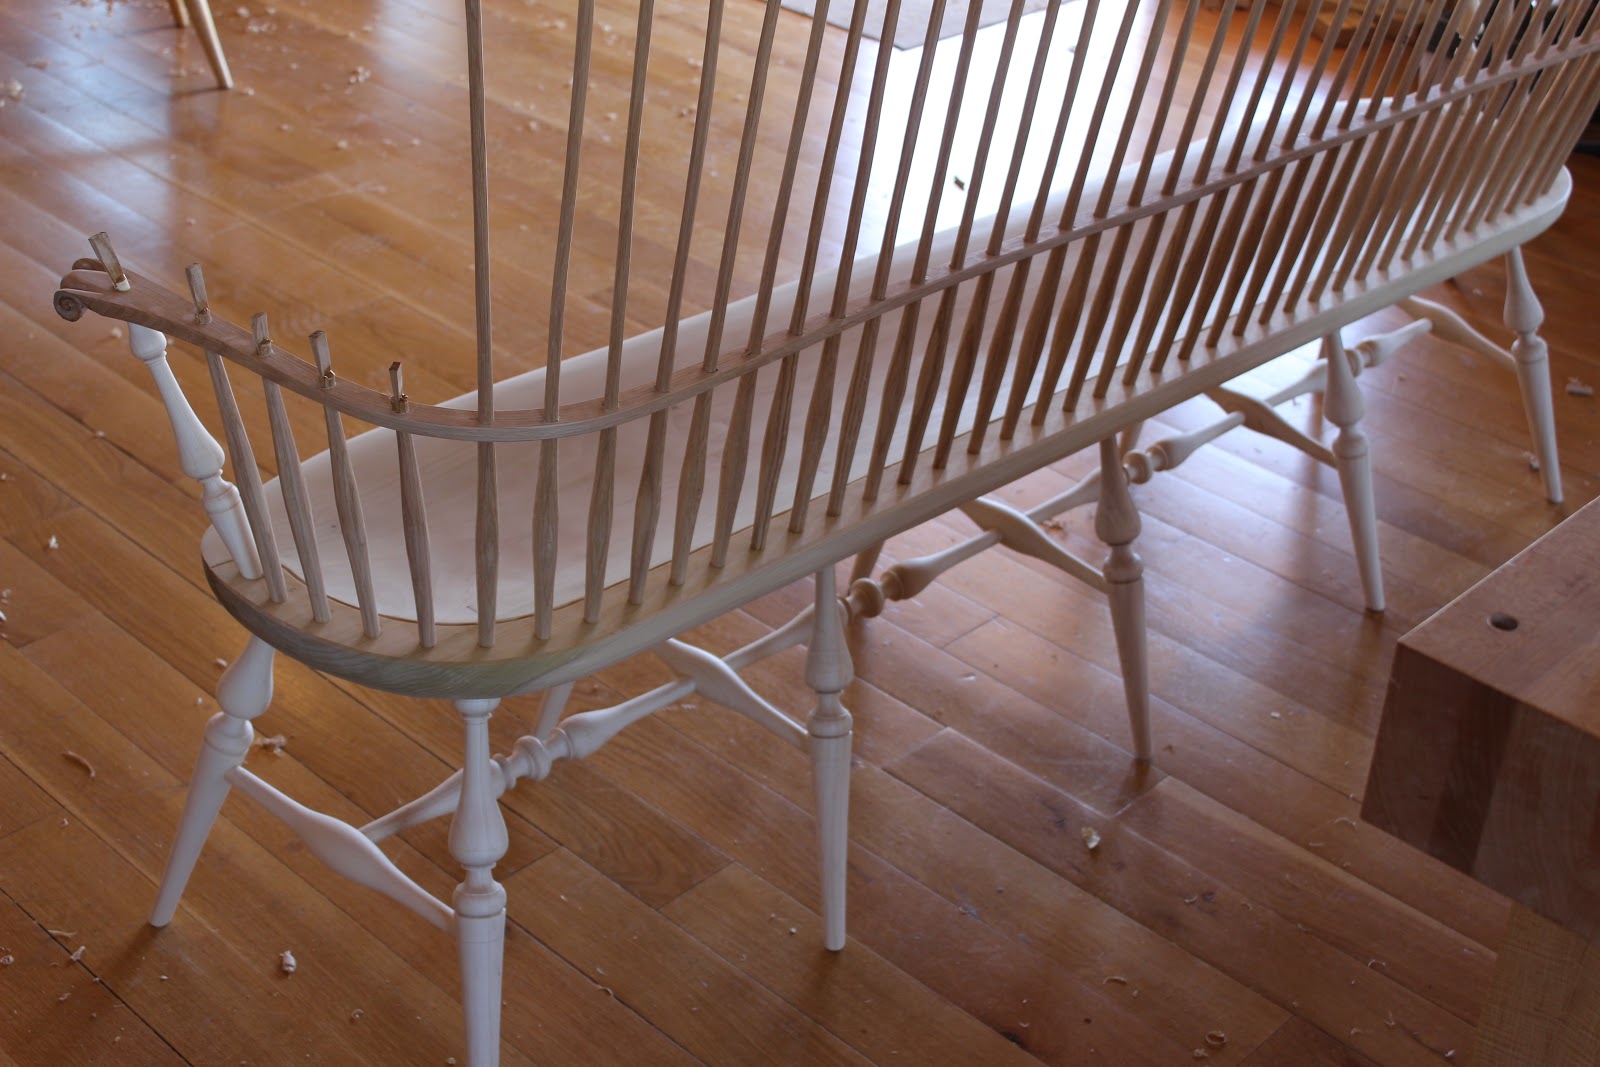
 The 6' settee is moving right along. Here are all the spindles roughed out and ready for the light bulb kiln. I think there are a few extras thrown in for good measure.
I am always amazed how much waste (or wood stove starter) one settee can create. This pile is from an 8' arm, 8' back, and 45 spindles. It filled up two 50 gallon bags. I should learn to make white oak baskets.
I forgot to show the back on the bending form the other day. It has a slight curve to help lift the piece and add some grace. 
 I typically carve white pine seats but all my blanks are for chairs. This settee seat blank measures 72'' long by 15 5/8'' wide. I found some one piece poplar blanks at Mimm's Lumber company out of Nashville at a very reasonable price. They were 90% heart wood which is easier to carve. SCORE!

After surfacing both sides I laid out the sight lines which I had to figure with the help of some rake and splay tables. The legs will splay out further as you go out to the ends again adding more grace to the piece. As you can see I have 5/8 drill bits demonstrating all the front leg holes drilled from the top. Those lasers sure keep everyone in line.
After all the drilling and reaming the legs I started the calorie burning task of excavating 10 pounds of shavings out of the seat. It felt like I was trapped inside a big tree and digging my way out.

As straight as the grain appeared in this slab of poplar there always seems to be a grain change in several places. Be patient and you will finally get to the bottom of the 7/8'' depth holes I drilled in about 5 places down the deepest part of the seat.
I finally have a giant dough bowl after scorp, travisher, and scrapers. I finished today by cutting off the ends and finishing the front edge. Later I will start turning all 9 stretchers. Much more to come.
This week I have Larry Clinard here making a sackback. This will be his first chair which is always exciting to see come together. He is having way too much fun with that drawknife.

Wednesday, February 6, 2013

A Classic Settee

I have built a handful of settees in my life but only a few like the one I will start today. Follow along and I will attempt to capture what is involved in building a six foot long, ten legged settee with a triple back. There is nothing difficult in designing this piece I just stretch a sackback chair and add a crest on top. I'll try not to bore you with too many details. I'll let the pictures do most of the talking.
I start with an 8 foot long log and split down an arm piece. 95.5'' long for the arm and 97'' long for the back. 

 Here is the arm mounted to the bench to help lay out the details.
 I will carve knuckles on this arm later after bending and drying. I don't glue a piece but leave the knuckle solid.
 This shows the arm roughed out and ready for the steamer. Very awkward working pieces this long.
 Here is my beautiful steamer. 8 ft long pvc with a wood block strapped to keep the tube from bending. This runs on only one wallpaper steamer and did fantastic. I left it in about 50 minutes.
 My bending form for the arm with the arm successfully bent. Notice that I modified it to use the same form for 4 foot settees. Hey, plywood is expensive.
 Next is a mass spindle splitting party. 45 spindles total including 25 thirty inchers, 12 twenty-four inchers, and 8 twelve inchers.
 The party continues inside on the horse roughing out square. This took me to closing time today. I'll continue rough shaping the spindles to get them ready for the kiln in the morning. Stay tuned.
 Here are the stools that Logan and I finished the other night. I think they turned out great and so fast. Good job Logan!

Monday, February 4, 2013

Harvesting Large Trees for Seat Wood

I get really excited about carving seats and trying different woods. The seat material I use on my painted chairs comes from white pine or poplar. The white pine I use comes from the north east and usually I order it from Nicholas Cicchinelli out of New York. I use a lot of pine for chair classes. Lately I have sawn some Sassafras into seat material. I flat saw these into 8/4 boards to get the widest possible seat blanks. Other woods I have sawn for seats have been Walnut, Cherry, Elm, Poplar, Basswood, and  Catalpa. If you have never carved Catalpa then you are in for a treat. We just sawed a 3' diameter Catalpa for seat blanks. It reminds me of carving butternut or Sassafras. Seat blanks are the only thing I have to saw then wait for a couple years to dry for chair making. As I stack these sometimes very large boards I get so inspired thinking of different chairs I can make. It is tough to have to wait. 
Here are some pictures a friend of mine sent me the other day. I wonder how many seat blanks one could get from these giants.
 Check out the length of that crosscut saw. These were some real men. Or maybe that lady helped too.
 Here is a shot of an Elm seat. I have cut a lot of these and although it is very tough to carve they make a very warm inviting texture. Very nice wood to use with white oak turnings.
Walnut always makes a nice seat material and takes such a nice finish with hand tools. This is a seat for a writing arm chair. Whatever you choose to carve make sure it is easy to work with hand tools and you will have a blast. Let me know if anyone has carved something unique for seats. 
 Ziggy finished his Galbert style ratcheting shavehorse which turned out very nice. It is made from a Sassafras natural edge piece with maple legs and dumb head. Works great. Pete Galbert and I are teaching this horse at Kelly Mehler's school this spring along with some tool tuning and other goodies. Spaces are filling fast but I think there might be some left if you hurry.