Thursday, January 31, 2013

Quality Time

Years ago when I first started blogging about what I did around the shop( hence the name) I wanted to go into details about what went on around here on a daily basis. There is so much more than just chair making that happens around here. This post shows just a few of the things that have taken place this week. First and foremost Logan, my son, has taken interest in making a simple stool. Now when Logan takes an interest in something like this I have tried not to overlook the fact that this is quality father and son time that I should not take for granted. We both approached this project with the idea we would use only hand tools and I took advantage to teach Logan all I could about legging up a stool which is the foundation to the lower end of the windsor chair. I am so close to getting Logan ready to build his first chair and I could not be more enthusiastic about this adventure. Below you can see the bottom of Logan's stool which he has used the scrub plane. He loved this surface and will not refine it any further. 
 Here are the legs to the stools which Logan preferred the copper wire burning for his legs. I opted for the simple cigar style turning with no ornamentation. I turned all the stretchers and they are cooking in the kiln. We should be assembling the stools maybe tomorrow or Saturday which I will post some completed photos. Logan helped and mostly designed this simple stool.
 Last weekend I found my way to the Nashville flea market. Not expecting to find much I came across this beautiful 4'' timber frame slick. I could not resist and wondered what such a hunk of metal would feel like through cross grain tenons. I think I got a really good deal and brought it home. Looks like someone really pounded the handle to an early death.
 Below you see after a new handle of sugar maple and a little sharpening it is ready for work. I still plan to build a garden tool shed later this winter and plan to test her out.
 Moving along I wanted to show my progress on my library which has been in shambles since last year when I put in the loft steps. My books and woodworking magazines have been out of control for over a year until last week when I got this bookcase built along with a new desk in one end of the loft. This is a great place to read or just relax in my rope chair. I don't know if this will make my productivity go up or down.
 Logan took this picture last night of me working on the stools. We are using the laser method to drill the holes and ream the legs. Logan designed the stool you see in the foreground. I will be teaching a weekend class on this stool next summer at the Appalachian Center for Craft in Cookeville.
 Also this week April has finished her side chair. Ziggy and April have done a great job completing their first chairs. Ziggy who has already finished and painted his chair is building a Galbert style ratcheting shave horse. I'll post some pictures when it's done. April is going to paint her chair before they head back home to Missouri.
 I can't leave out this week without a picture of my good friend Pete Wiens who is sawing out bowl blanks from the beech log I brought home. I have turned 2 bowls this week from this which came out pretty good. I have lots to learn about this process but Pete is a great turning instructor. There is nothing more fun than turning green wood. This has been a busy week but I love the variety of things that have happened. I have not evened mentioned half of what has gone on this week but it has been quality time.
Wednesday, January 23, 2013

St. Peter's Cross

If the best addition to my shop was my workbench then the best addition to the workbench has to be the new criss-cross from "Benchcrafted". Anyone who has the leg vise with the pin at the bottom to adjust to whatever thickness that you clamp should not walk but run to your computer (or phone) and order this update from Jameel. If you are looking to buy vises to build your next bench then Benchcrafted is the place to go.
 Above you see the old leg vise assembly. Below you see the retro kit with what they send to you. It is pretty straight forward and they offer really good instructions and a video to make it very doable.
Be careful lying the bench over to mortise out the leg. I did this alone and the 300 lb. bench came down faster than I wanted. I had help picking it back up. No harm done, just woke me up.
Here is the leg mortised with the cross installed. Careful measuring makes this easy along with a good router and fence system. Love those dusty, noisy routers!
You do have to replace the chop since it has to be bigger to house the other cross piece. You can drill most of it out on the drill press which makes the routing quicker and easier.
Here is the finished leg vise and it work fantastic with no adjustments. I just have to get some more leather and I'm back in business.
My good friend Pete Wiens came over and turned this bowl on my new Jet lathe. This is the biggest bowl I can turn on this lathe and Pete is getting me set up to turn things like this. This is nothing like turning chair legs and I have lots to learn but wow what fun. Now I just need to start carving spoons.
Anyone who knows me knows I have a problem with collecting drawknives. The problem is I can't stop. This is my newest addition. "Barr's" chair makers drawknife designed by my friend Curtis Buchanan. I had Barr make it as a bevel up knife. After some final honing and slightly bending the handles this guy really sings through wood. Well now I have an improved bench vise and a new drawknife. I guess I need to make some more chairs.

Sunday, January 13, 2013

Drawknife Refurbish


This was the first drawknife I ever bought. Ray Larsen who operated Genuine Forgery made this knife.  Many of you may have this knife. I think it was inspired by The Windsor Institute which Ray ,before his retirement ,has sold many of this knife. I also have his scorp and really like the geometry of that tool. I see this drawknife from time to time pop up in classes that I teach. I really liked the knife when I first used it many years ago but have since let it collect dust as I have found better knives to replace it.
 As you can see below this knife is ground to a knife edge. The handles are set in a neutral position which allow you to use this drawknife up or down. The biggest problem I have with this knife is how hard it is to sharpen and also it seems to dive down into the cut. I really like the quality of this knife and I think with a few changes in geometry this knife can perform really sweet.

 The first thing I do is hollow grind the back of the blade. The back is the side not stamped "Genuine Forgery". I use an angle grinder to hollow out the back which allows me to flatten the back easier. My goal is to make this knife a bevel up user.
 After lots of grinding and working across my water stones I manage to get the back really flat as you can see below which I finish to an 8000 grit stone.
 Then I simply use my jig on the slow speed grinder to make a hollow grind bevel on the top side of the knife. The I sharpen like I would any antique knife until I get a very sharp edge.
 After the knife is razor sharp I cold bend the handles very slightly down to make the knife work as a bevel up knife. I like the bevel up knife because it follows the long grain wood fibers very nice when making chair spindles. I love the results and really like the idea I have taken a drawknife I never use and made it sing once again. I think Ray Larsen would be proud.
  Here is the final shot of the youth chair with the black over red milk paint. Once I get the walnut table done I will deliver these to North Carolina. "Road Trip!!!"

Wednesday, January 9, 2013

Seat Drilling Machine


My friend Matt sent me this picture of the "Nash Rye chair seat borer". Looks like a winner. Wonder where it will fit in the shop? I might even be able to keep up with Dunbar's productivity. Especially if I get rid of my shave horse.
On a more serious note my youth chair received the foot rest today and is ready for paint.


Tuesday, January 8, 2013

Beech Vacation!!

Well, maybe not the beech vacation I hoped for. I just acquired some free firewood. 30'' diameter beech. My stove is smaller than most and I have to cut my own firewood 12'' long to fit the stove. This was some beautiful wood but my sawmill is set up in Indiana right now and I had no way to pick up a 3000 pound log. It does split into nice looking firewood. Anyone needing exercise or want to work on their new years resolution please stop by for some splitting action. I'll even buy lunch!

I'm just about finished with a youth chair I've been making for a customer in North Carolina. Here are the beginnings of the carved knuckles.


 This is always a fun little chair to make. I'll try to show some completed photos after painting soon.

Here is Ziggy's first chair that he completed today. I think he will make a fine chair maker.  
 Here he is painting the red base coat of milk paint. I think he will finish this with some Bayberry Green paint for the last two coats. While this coat was drying he carved a spoon and turned a rolling pin. Good job Zig!


Thursday, January 3, 2013

Comb Back Rocker

I learned to make this chair from Curtis Buchanan many years back at his shop. I have made more of this style than any other over the years. I have changed the carvings on the crest and the hand holds but kept most of everything else the same. It is a classic and is hard to improve. It has always been my favorite chair for comfort.

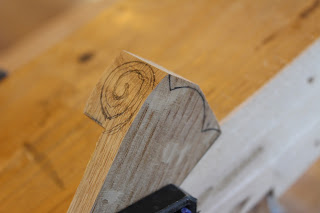
Here is a detail of the hand carving which is similar to the way a violin is carved.


 The crest is simply inspired from the volute of a violin. The simple spiral is seen in nature as an ammonite fossil. It is always a fun chair to make and has much potential for other designs with different turnings and spindle styles. I hope to have more time to play with different forms in the near future.


Wednesday, January 2, 2013

Happy New Year!

I am looking forward to an exciting new year. Lots to do and learn and teach. For those of you who may not know I'll recap as to what all I do here in middle Tennessee. First of all here is a shot of my machine wood shop that most people never see. So much of what I do is in the timber frame shop but occasionally I make tables, cabinets, jigs, seat glue-ups, etc....and not being a purist I depend on these tools for these task.

 Here is the shop in its recent view with chairs in various stages of completion. This is where I spend most of my time either making hand made chairs or teaching. I also offer chair material for those who know the craft but just can't find good quality logs.
 I am still using and teaching with the lasers. It still sounds cheesy to have to use this method but ever since I came up with this it really is accurate and I find myself very comfortable using and teaching this way to drill, ream, and even find "true center" of chairs. Creating lines in space is simple and very useful. Try it and let me know what you think.
 I also teach turning which can be useful for things other than just chairmaking. I offer one and two day classes on turning. Learning to sharpen tools correctly and proper geometry is very important. I also sell turning kits for chairs if turning is not your thing. Contact me for details.
 My newest tool addition is this Jet lathe the "1642" which really is smooth and powerful. I will be up-grading my Jet tools in the near future and look forward to trying the newer technology. Notice the two tool rests that allow turning chair legs without moving the tool rest. Later I might weld these together but for now it works great.
Thanks for all those who made 2012 such a great year. This business has allowed me to meet some really interesting people and form new relationships. I look forward to 2013 and traveling the country teaching and meeting new folks. Peace to all.