This is what happens after you have completed over 200 turnings in one week. Your brain decides to do something useless but artisitc. Besides, when will I have so many turnings in one place again.
Friday, April 1, 2011
Berea Bound
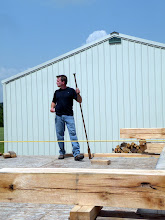
Well, we did it. The turnings are done. Below you see Pete Wiens and myself with everything done. Pete did half of the double bobbin legs. Pete is an accomplished turner who just finished a comb back class and decided to help me over this mountain. Thanks Pete!
Everything is ready to go to Berea, Ky. to help with Pete Galbert's class at Kelly Mehler's. This has been great fun turning and splitting chair parts for 26 chairs. I look forward to the 2 classes we are doing and the awesome food Kelly provides. I have said it before, if you haven't been to one of Kelly Mehler's classes you are missing a fantastic opportunity. See everyone in a few weeks!
Tuesday, March 29, 2011
Oops!

With some help from Pete Wiens and Bob Peterson we did manage to gather a few. That's me on the left only wishing I was able to cut the beech tree you see behind us. This tree was near 200 years old and 4 feet across. Pete(far right) wanted a quarter section to turn on his lathe so I tried to cut a piece for him. The tree company people felt sorry for my little 20'' Sthil chainsaw and showed me up with his monster saw which melted through this log without hesitation. He grinned the whole time he was cutting. He knew he had showed me up. I'd like to see him make a chair!
I like being able to select the trees while I can see them standing. We also cut some post and rafters for the front porch of my shop. This will be my next project after returning from Kelly's school mid April.
I like this picture showing all the wood I have been collecting the past month. On the trailor the front porch wood, the chair logs already unloaded on the ground(by the way they split very well), and in the back ground tons of firewood for next winter.
I have had lots of students at the shop during all this and one more class to teach right before I leave for Berea to help Pete Galbert. I finished the last of the turnings tonight and will post some pictures later this week. Time for a nap!
Sunday, February 13, 2011
Preparing for Class
Once again I have the honor of assisting Peter Galbert with the chair class at Kelly Mehler's school this spring in Berea Kentucky. We had a great class last year and the responce to this years class prompted Kelly to add another class. So we have 2 weeks and 2 different sets of students. Pete is flying in from New York so I'll be responsible for all the materials. No pressure there, right?
I've aquired a nice oak log for spindles and a nice sugar maple for all the turnings. I sawed the maple into 5 foot lengths and then sliced them up into 8/4 on the sawmill following the grain as close as I could.
Friday, February 4, 2011
Laser Reaming
Sometimes I like to bounce new ideas off of students. Sometimes I get a blank stare or "yea, that's cool", but yesterday after showing Pete Wiens how to drill and ream his stool seat with sight lines and mirrors it hit me that I needed something different. The problem is getting someone who isn't use to looking at sight lines and bevel guages to ream at the proper geometry to get all the legs really close to what they should be. Up til now "really close" was the best I could hope for. All I said to Pete was "what if we had lasers?", and today we have what you see below. With this set up anyone can ream the tapered holes for the legs spot on. It gives the students more confidence than I could ever imagine and it really sets up in seconds. If it were not simple then believe me, I would not fool with it.
It works like this. Go to the local home improvement store and pick up two cheap $15 B&D line lasers. They have a small magnet on the bottom. We built the base out of scrap wood with a heavy hardwood bottom for stability. It's good to have rubber glued under the base so they won't slide around on the bench. The dowel makes it adjustable for easy setup. The laser sits magnetized on a metal nut imbedded in the base.
Now on the bottom of your seat blank after you have drilled the straight holes from above the usual way, draw a perpindicular line across the hole to the sight line. Set up one of the lasers tilted to the drilling angle and sighting down the perpindicular line. The other laser will be adjusted to 90 degrees to the seeat blank and sighting straight down the sight line. Stay with me now.
Now all you have to do is start reaming keeping the crosshair of the lasers right on the top point of the reamer. That's it! It comes out perfect and I have not found a flaw yet.
A couple things to remember. Never look directly into a laser. This set up with this brand of lasers keeps the line of light lower than eye level. Also it helps to turn off the lights above your workbench. I have windows all around and still had no problem seeing the laser lines. Also turn the top of your tapered reamer slightly concave so the laser will fill in to the top of the reamer. I hope this will shead some light on reaming perfect angles. Good luck.
Saturday, January 29, 2011
The Next Generation
The other day I picked up my son from the bus stop at the end of the driveway (our driveway is almost half a mile long).After the usual questions about homework and how was his day I could tell something was on his mind. I had recently been working on a small walnut jewelry box for his girlfriend which had to be done right away. To my surprise he told me she broke up with him at school that day. I remeber how that feels and you want to take the hurt away but you can't. At least he hadn't given her that dovetailed jewelry box yet. Boy, 6th grade can be tough!
Let me introduce you to my son Logan. He's eleven (and a half). He is so full of life and loves to tinker with tools in the shop. You can see him below cautiously carving the front of a seat. What you can't see (or hear) are all the questions and comments as he works away. "Dad, why is the wood so rough right here? Dad where can I carve next? Boy this really hurts my arms. How far down do I carve? Can we make a bow and arrow now?" The questions are not much different than the ones my more mature students ask. Watching someone for the first time try to figure out grain direction is cool. It's something I do without thought but first timers go against the fibers every time. It doesn't take long for the wood to tell you what you are doing wrong.
I use to not let Logan pick up sharp tools in the shop but he has really taken an interest with the draw knife, spokeshave, and shave horse. The practice is priceless at his age to learn the nuances of wood. His mind is like a sponge.I wish I had this opportunity 30 years ago.
I guess we haven't done too bad as parents .Logan has such a big heart and strong mind. He is very respectful of his elders and likes to help those who are less fortunate. I would love more than anything for him to follow his old man's footsteps but whatever he does I know it will be great and with that blond hair and blue eyes I'm sure he will find a new home for that jewelry box.
Recently I commented to Pete Galbert about a method to grind the relief on the back of my draw knives. I was using rare earth magnets stuck to my tool rest but the magnets collect the shavings and tend to bind the knife as I work it back and forth on the edge of the slow speed grinder. I now just free hand it on the rest without any sort of fence which works fine. You could clamp a wood fence to the rest and apply paste wax to smooth the operation.I move the blade close enough to hit the back in the center and hollow out enough to aid in honing the back flat. Sorry I don't have a picture of this but it is very similar to Pete's method of sharpening the bevel. You only need to do this once and it's so fast and effective for future honing.
Let me introduce you to my son Logan. He's eleven (and a half). He is so full of life and loves to tinker with tools in the shop. You can see him below cautiously carving the front of a seat. What you can't see (or hear) are all the questions and comments as he works away. "Dad, why is the wood so rough right here? Dad where can I carve next? Boy this really hurts my arms. How far down do I carve? Can we make a bow and arrow now?" The questions are not much different than the ones my more mature students ask. Watching someone for the first time try to figure out grain direction is cool. It's something I do without thought but first timers go against the fibers every time. It doesn't take long for the wood to tell you what you are doing wrong.
I use to not let Logan pick up sharp tools in the shop but he has really taken an interest with the draw knife, spokeshave, and shave horse. The practice is priceless at his age to learn the nuances of wood. His mind is like a sponge.I wish I had this opportunity 30 years ago.
Recently I commented to Pete Galbert about a method to grind the relief on the back of my draw knives. I was using rare earth magnets stuck to my tool rest but the magnets collect the shavings and tend to bind the knife as I work it back and forth on the edge of the slow speed grinder. I now just free hand it on the rest without any sort of fence which works fine. You could clamp a wood fence to the rest and apply paste wax to smooth the operation.I move the blade close enough to hit the back in the center and hollow out enough to aid in honing the back flat. Sorry I don't have a picture of this but it is very similar to Pete's method of sharpening the bevel. You only need to do this once and it's so fast and effective for future honing.
Friday, January 28, 2011
Everything In Its Place
Organization has not always been one of my strengths. If you don't believe me then come check out my pole barn full of un-graded lumber or check out my garage shop after building a case piece. It didn't take me long (after sweeping expensive tools into the burn pile) to come up with the tool cabinet you see below. Modeled after Andy Rae's tool cabinet in "The Toolbox Book" from the Tauntan Press, it holds most of what I use while making chairs.
A quick glance and I know if a tool is missing. Forcing myself into these good habits has been very helpful. It keeps the bench clear as well as my mind. Now that I am getting more established in the new shop I am beginning to hang tools on the walls.
I have also brought my woodworking library and magazines out to the shop and designated a small area for writing, reading, or just deep thought (or a blank stare). This is the first time I have ever had all my magazines in order which can be so nice trying to find a particular article. Hey Pete, I have room for one more book!
Recently I had Sam Hughes from South Carolina come for a two day milk paint class to paint the chair he made in Pete Galbert's class last year. He chose the black over red technique which seems very popular among most. He stayed on the rest of the week and built a shave horse. This is the third class I have taught building the shave horse. Sam did a great job and will return to Kelly Mehler's this spring for another chair class with Pete. I'll be assisting Pete again this year at Kelly's. His school is always a blast.
Wednesday, January 19, 2011
Building Horses
Lately I have had a couple students building shave horses for a class they will take here in March. Pete and Bob live here in town so I'm helping them along to get things ready for the class. I have always been a big fan of the horse which Brian Boggs designed with the ratcheting head. It's a good size to haul around and seems to fit just about anyone with the adjustable seat. The plans for this horse is in Fine Woodworking issue #139. It is made from 8/4 stock and the widest board is 8'' but could be glued up of coarse. I prefer hard wood to pine for durability, especially the ratcheting part and clamping areas. We used cherry and maple since I had so much dry stock lying around. If you have built chairs without the use of this tool then you are missing one of the best ways to clamp and re-clamp wood quickly and securely. While pulling back on the draw knife through the wood you naturally push with your feet so it's a natural effect.
On this horse the only change I made was adding a place to rest the draw knife on top of the post. It just seemed like a natural place and the edges of the blade are not exposed while not in use. I guess it's sort of a tool tray. I still don't like tool trays on benches.
This past week I have had Ron Underwood taking a class on fine furniture. He wanted to do a sugar chest based on one he sold to the Tennessee State Museum about 30 years ago. Made from walnut the case features half blind dovetails. The base is mortised and tenoned with a nice crotch drawer front. These were the first dovetails that Ron has cut and I must say that half blind case and chopping the crotched drawer front is quite a challenge for a first timer but he did great. I always teach cutting the pins first which has always seemed more natural to me, sorry Kelly.
Ron will return next week to finish the sugar chest. Just so you know, the sugar chest was used to store sugar in the late 18th and early 19th century primarily in the southern states. It was stored under lock and key. The top will have breadboard ends with applied mouldings around the top and waist.
Subscribe to:
Posts (Atom)