Tuesday, August 12, 2014

The Weekend Bench

One of the many joys of teaching is getting to work with people who really want to learn. My wife teaches 2nd grade and lots of her students are not always as enthusiastic as mine. I always come away from these classes having learned more than I knew before either about chair making, tools, or just the human spirit. I also get to clean my shop as you can see below which is all ready for the class I did on live edge benches last weekend.


I had Bob and Shane here last weekend, two friends from Mississippi. They were a joy to have here and Bob got my #5 Stanley cutting really sweet. He had a way of getting tools really sharp. You should check out his blog here. The Christian Tool Cabinet
 Shane finished the edges of his walnut bench with a gouge which I thought looked great.
 They both did so well that for the first time in my teaching history we put on a finish of oil/ varnish in class.
 The class was a great success and I know these guys probably went home and slept really long. They worked really hard. Great job guys!


Also I encourage you to sign up for the November writing arm class. I have a few spots left and if you like a challenge to build something very unique now is the time to sign up. See the class schedule at  the top of this blog. I have other classes available as well.

Wednesday, July 30, 2014

Three Chair Makers Walk into a Bar

Ok, sounds like the beginning of a joke but it kinda happened. I had a visit from two incredible chair makers last week. Glen Rundell (far right). He builds and teaches windsors in Australia .He was here in the states visiting old friends and other chair makers. Jeff Lefkowitz (center) builds and teaches Brian Boggs classes on ladder back chairs. Glen took a class on ladder backs with Jeff the week before and they both drove here to hang out until Glen flew back home from Nashville the next afternoon. It was great to finally meet Glen and Jeff who previously I had only corresponded with by email. I guess this is sort of a rare picture. Very cool to have one of the best ladder back chair makers in the U.S. and one of the best windsor chair makers in Australia right here in my shop. 
  This is my student David who was also here last week. He was here to make a comb back chair but since it was just him I talked him into making a rocker. He did fantastic!
 Carving the shield seat.
 Carving knuckles
 Friday afternoon day 5 assembly.
 Saturday morning and all complete. Always a comfortable and nice looking chair. Great job David!
 Here is my latest venture, a 1951 Ford 8N tractor to restore. I bought this from Bill Nelson who just sold his farm up in Indiana. We have pulled a few logs from the woods with this old tractor.
 He had the original front rims with the original tires from 1951.
The tractor is in great shape and purrs like a kitten. For those that don't know before I made  chairs I was a diesel mechanic for 17 years so maybe this is my way to use those skills to completely restore this classic. (Hey Jameel I finally got some old American iron)

Wednesday, July 16, 2014

Living Large

I have been out of the shop lately on vacation. Nice to get out and see the world on occasion. On our trip through Charleston we had to stop and visit the majestic Angel Oak on John's Island. There is nothing like standing next to the largest living thing on the east coast. This oak is more than 1500 years old and has branches that touch and grow under ground. If you are ever in the area you must visit this tree.

 We mellowed out on Surfside Beach in South Carolina. I think I woke up everyday at 5:30 to shoot sunrise photos over the ocean. I'm sure my Face Book friends are tired of them. It was nice to do nothing for a week but I am glad to get back to what I love.
 Later this week Charles Brock is coming by the shop to film an episode of the Highland Woodworker. I also have a class to teach the following week then back to chair making.

Thursday, June 19, 2014

Where It All Begins

So much is talked about how to make furniture, the tools, methods, design, finishing, etc.. but little is talked about the materials from the woods, yes the woods, the forest, the birthplace of all of our woodworking projects. The almighty tree. The greatest renewable resource we have. For those that make things from wood with their hands probably at some point start to notice trees along the highway, backyards, anywhere trees grow which after seeing one growing on a roof top the other day I guess anywhere. Making greenwood chairs really opens your eyes what to look for in standing timber or even at the log yard. Words come to mind such as cat eyes, twisting grain, taper, and off center pith, all things to avoid when looking for timber to work with hand tools.
What do I look for in the woods?  Look at this textbook white oak. The bark does not twist, the tree does not taper much, very little cat eyes(knot inclusions), and the tree does not lean which most likely will have a nice centered pith. Everything appears to be fantastic wood to rive, split, shave for chair making. Nothing is for sure until the log is split.
 This white oak from southern Indiana was cut this morning. I was able to get two 8' logs with very little cat eyes in the second cut. These logs had such little taper that there was not 1'' difference in diameter in 16 feet. The center was starting to rot but not too much concern since I only use the 3-4'' of heartwood beneath the sap. The smaller logs I find to be more "tender" and bend well. This one is only 15'' diameter. Tomorrow I will split the log up and see if my expectations were correct. Stay tuned.
 I finished the rocker I started in the rocker class a while back. Black over red, always a classic. This one is for sale if you are interested. I rarely have one available.
 Here is a shot of the c-arm bar stool I built for a customer. This one is Driftwood over Lexington Green. Looks sort of an army green but I like it.
 I jammed some old handles I had onto my drawknife I forged the other day. I am surprised at how nice this tool works. I am going to make more knives using thicker metal and see what the results will be. I plan to fashion a scorp as well.
 Finally for those wondering how the the little timber frame is going, well it will have to wait until I get caught up with all the chairs and classes I am teaching. I hope to resume construction later this summer.
Saturday, May 31, 2014

Forging Ahead-Lessons From a Teenage Son


A while back my son Logan came home from a bike ride with a friend of his and a bucket of railroad spikes. My only thought was "don't tell your mother you were walking around the railroad tracks". Who hasn't done that as a kid. Anyway, Logan had this big idea of making knives out of them. His drive was his friend and probably you-tube. He mentioned it several times but I did not take him serious until I saw my pole barn. Logan set it all up as a forge. He even blocked in my lawn mower so I new what we were doing today. I really was impressed with how efficient he set it up. I particularly like the gas forge on blocks. I hooked up the propane and we were ready.

 Now everything I have read about RR spikes is that they don't have enough carbon to hold an edge. But this is an exercise for Logan to do something that has been on his mind for a long time and I think he will learn a lot.
 The spike goes in and I think we were both giddy with excitement not really knowing what may occur.
 As Logan begins to pound the metal I could see how much he enjoyed seeing it begin to take shape.
 Many trips back to the heat before finally quenching in water. We were having a good time and I was so glad to have Logan away from the video games for a change.
 Bam! We have a knife. No reason to heat treat since the lack of carbon in the RR spike would not  make any difference. We semi sharpened and polished her up. Logan has taught me a lot today....what next?
 All this fun got me thinking about the O1 tool steel that I had. Naturally I had to try and make a drawknife no matter how crude it might be.
 Bam! We now have a drawknife. This thing actually took an incredible edge and cuts great. Might even be worth fashioning some handles. The drawsharp worked great getting her sharp in short order. I may have to do this again but make a scorp next..............
 Logan decided to attach the hammers to the stump, way cool Logan. He is really getting into this.
 Well as we say here in Music City "the proof is in the pickin" and the new chair makers bench has been broken in carving the first seat. I could not be happier. The only problem was where to place it in the shop.
 I decided perpendicular to the other bench. Plenty of room to work around each bench and still close to the tool cabinet. Tomorrow I'll take the day off then Monday hit the ground running hard getting some chairs out the door.

Wednesday, May 28, 2014

Short and Sweet (a chairmakers bench)

Well, after a few hours work the first dedicated chair makers bench in Sumner county is complete. First and foremost I think any bench should be massive, heavy, thick, and won't dance across the shop in use. The Roubo style fits that bill perfectly. But beyond that a chair makers bench should be slightly wider (26 1/2'') to handle the rake and splay of the legs. Not too wide since carving a seat involves 180 degrees of movement around the seat while carving. That is why the top is shorter (4') in length. 

 The leg vise is very powerful for holding seat blanks in place. I also made the chop 9'' wide for more purchase on the seat and also for the leg jig when drilling the undercarriage assembly. The vise is closer to the end of the bench for easy carving on end grain. The Benchcrafted vise works just as sweet as the video you see on their website.
 I have four of the hold fasts ready for use around the bench. These are a must for holding the seats in place while carving. The top is 4'' thick and I drilled a 1 1/4''counterbore underneath every hold fast hole leaving only 2 3/4 thick material. I have had problems in the past with them not holding in thicker tops. This always solves the problem. Matthew O'Neill also gave me a good tip the other day of using a center punch on the shaft of the hold fast to help grip the hole. Good stuff.
 The base has the same shelf like my other bench using ship lapped boards which float on cleats.
 The biggest improvement was eliminating the tail vise getting all the dog holes out of the way of the chair legs. I also moved the hold fast holes closer toward center for the same reason. I like the split top design without a tool tray but open on each end to use clamps to hold chairs in place after legging up. The gap is 1 3/4'' wide to accommodate the style of clamps I use.
Overall there is not really a lot of difference other than just tweaking a few things that kinda bugged me about the other bench.There are things that will still work better on the other style bench so it's good to have both. Especially when I have four students at one time. You all let me know what you think. Happy chair making!

Sunday, May 25, 2014

The Local Blacksmith


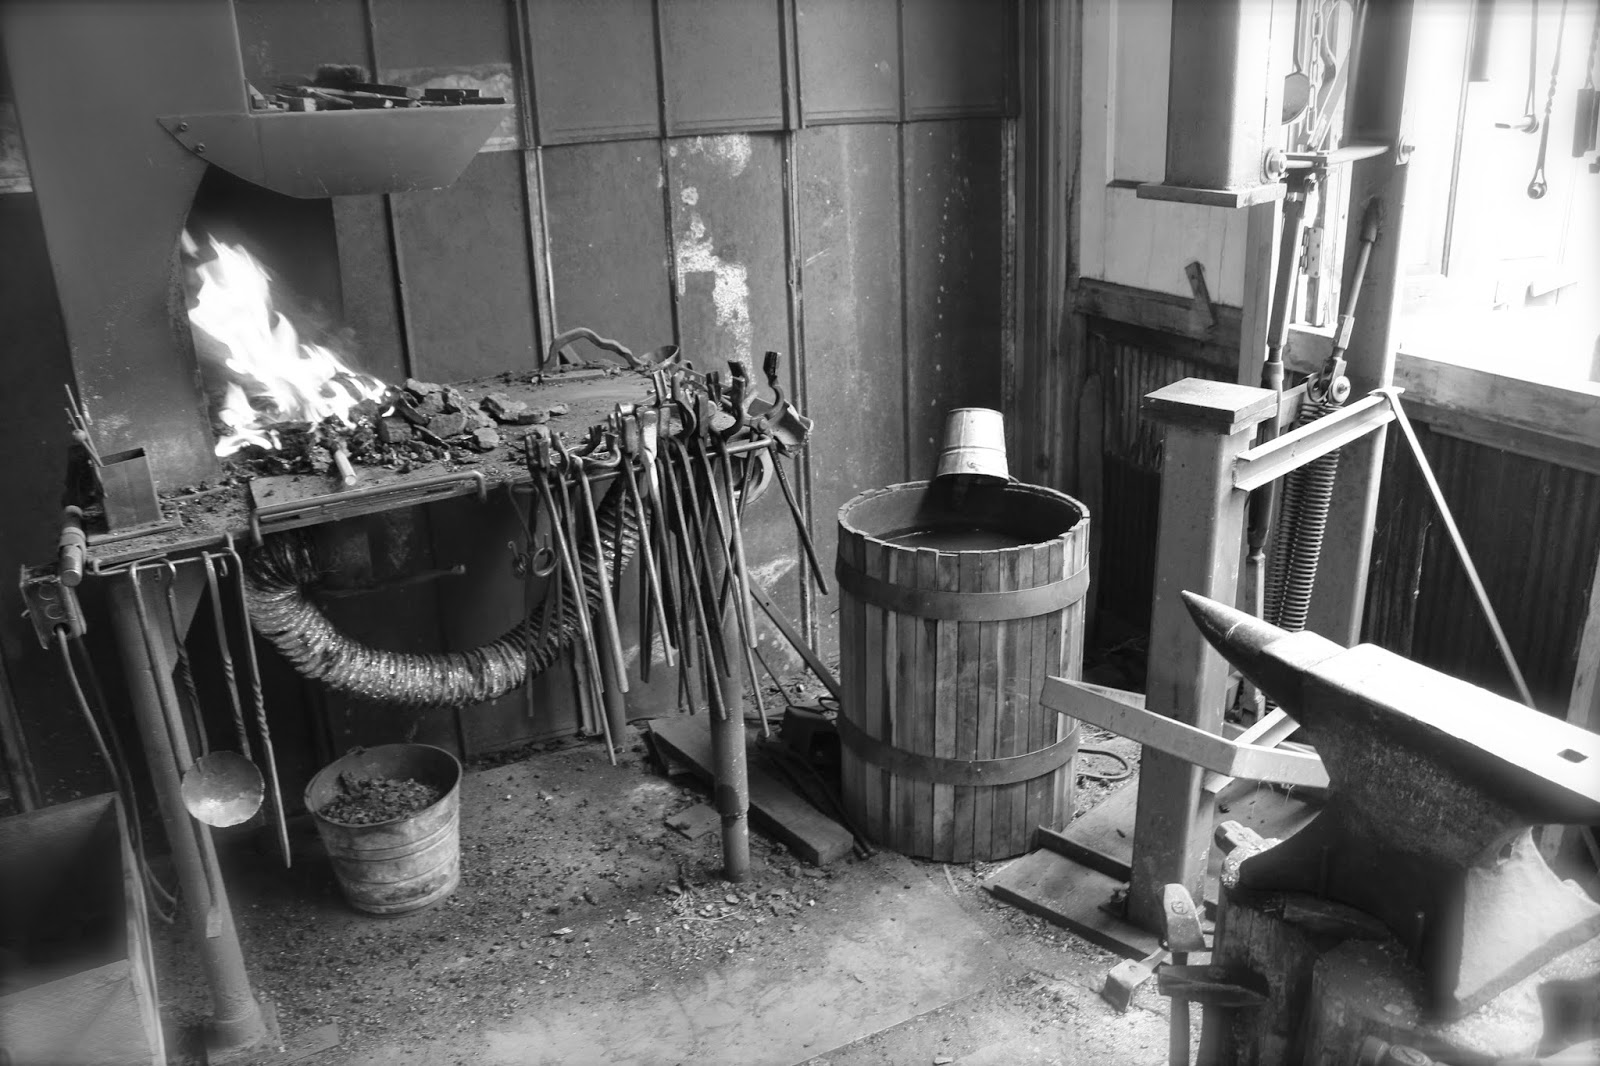
Remember the good ole days when every town in America had a blacksmith shop. Yea, I don't either and why is that? I guess with modernization and faster ways of doing things we just don't slow down and make something with our hands from raw material like we use to. Enter Anthony Martin, owner of Red Tail Forge. This is why I love my job because it takes me places in search of high quality tools. The ones you don't find in fancy warehouses. The simple shop of a blacksmith. You know I like simple but there is a lot to know when working metal and it's cool to watch a master at work.

 Anthony, like most blacksmiths, makes a lot of his own tools. You can see the wonderful array of holding devices below that become an extension of his hands to hold the work while shaping and bending. Unlike woodworking Anthony can't feel the metal in his hands while working but if a mistake is made he can simply heat the material back up and start again. It's much harder than he makes it look and I was very jealous of his abilities.
 The heart of every good blacksmith shop is the anvil. This is a 19th century version from England which has the original owner's signature from the 1800's.
 Anthony was very gracious to spend his Saturday making me some hold fast for my new chair makers bench. He started with 11/16th round stock 18'' long and heated up the end.
 Stock this big is then pounded using the antique power hammer. A very impressive machine that shows no mercy. He squares the ends which also stretches them a little lengthwise.
 He follows with hand hammering the point to begin the start of the leaf pattern. Then he hammers out the leaf and veins, bends the upper section to the correct geometry all while constantly re-heating the metal. Anthony moves with a purpose and operates like a well oiled machine. I guess you can say he had many irons in the fire, literally.
 After final shaping he hangs them to air cool. You don't quench these since they have to be pounded during use and must flex to hold the work.
 Several hours later we had six hold fasts ready to work. All tested great and each had there own personality. Just like I wanted. Anthony far exceeded my expectations and I can't wait to show you the new chair makers bench with these new hold fasts. The bench is almost complete so stay tuned for the results.