Sunday, January 13, 2013

Drawknife Refurbish


This was the first drawknife I ever bought. Ray Larsen who operated Genuine Forgery made this knife.  Many of you may have this knife. I think it was inspired by The Windsor Institute which Ray ,before his retirement ,has sold many of this knife. I also have his scorp and really like the geometry of that tool. I see this drawknife from time to time pop up in classes that I teach. I really liked the knife when I first used it many years ago but have since let it collect dust as I have found better knives to replace it.
 As you can see below this knife is ground to a knife edge. The handles are set in a neutral position which allow you to use this drawknife up or down. The biggest problem I have with this knife is how hard it is to sharpen and also it seems to dive down into the cut. I really like the quality of this knife and I think with a few changes in geometry this knife can perform really sweet.

 The first thing I do is hollow grind the back of the blade. The back is the side not stamped "Genuine Forgery". I use an angle grinder to hollow out the back which allows me to flatten the back easier. My goal is to make this knife a bevel up user.
 After lots of grinding and working across my water stones I manage to get the back really flat as you can see below which I finish to an 8000 grit stone.
 Then I simply use my jig on the slow speed grinder to make a hollow grind bevel on the top side of the knife. The I sharpen like I would any antique knife until I get a very sharp edge.
 After the knife is razor sharp I cold bend the handles very slightly down to make the knife work as a bevel up knife. I like the bevel up knife because it follows the long grain wood fibers very nice when making chair spindles. I love the results and really like the idea I have taken a drawknife I never use and made it sing once again. I think Ray Larsen would be proud.
  Here is the final shot of the youth chair with the black over red milk paint. Once I get the walnut table done I will deliver these to North Carolina. "Road Trip!!!"
Wednesday, January 9, 2013

Seat Drilling Machine


My friend Matt sent me this picture of the "Nash Rye chair seat borer". Looks like a winner. Wonder where it will fit in the shop? I might even be able to keep up with Dunbar's productivity. Especially if I get rid of my shave horse.
On a more serious note my youth chair received the foot rest today and is ready for paint.


Tuesday, January 8, 2013

Beech Vacation!!

Well, maybe not the beech vacation I hoped for. I just acquired some free firewood. 30'' diameter beech. My stove is smaller than most and I have to cut my own firewood 12'' long to fit the stove. This was some beautiful wood but my sawmill is set up in Indiana right now and I had no way to pick up a 3000 pound log. It does split into nice looking firewood. Anyone needing exercise or want to work on their new years resolution please stop by for some splitting action. I'll even buy lunch!

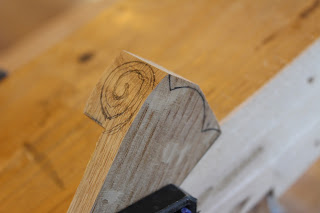
I'm just about finished with a youth chair I've been making for a customer in North Carolina. Here are the beginnings of the carved knuckles.


 This is always a fun little chair to make. I'll try to show some completed photos after painting soon.

Here is Ziggy's first chair that he completed today. I think he will make a fine chair maker.  
 Here he is painting the red base coat of milk paint. I think he will finish this with some Bayberry Green paint for the last two coats. While this coat was drying he carved a spoon and turned a rolling pin. Good job Zig!


Thursday, January 3, 2013

Comb Back Rocker

I learned to make this chair from Curtis Buchanan many years back at his shop. I have made more of this style than any other over the years. I have changed the carvings on the crest and the hand holds but kept most of everything else the same. It is a classic and is hard to improve. It has always been my favorite chair for comfort.

Here is a detail of the hand carving which is similar to the way a violin is carved.


 The crest is simply inspired from the volute of a violin. The simple spiral is seen in nature as an ammonite fossil. It is always a fun chair to make and has much potential for other designs with different turnings and spindle styles. I hope to have more time to play with different forms in the near future.


Wednesday, January 2, 2013

Happy New Year!

I am looking forward to an exciting new year. Lots to do and learn and teach. For those of you who may not know I'll recap as to what all I do here in middle Tennessee. First of all here is a shot of my machine wood shop that most people never see. So much of what I do is in the timber frame shop but occasionally I make tables, cabinets, jigs, seat glue-ups, etc....and not being a purist I depend on these tools for these task.

 Here is the shop in its recent view with chairs in various stages of completion. This is where I spend most of my time either making hand made chairs or teaching. I also offer chair material for those who know the craft but just can't find good quality logs.
 I am still using and teaching with the lasers. It still sounds cheesy to have to use this method but ever since I came up with this it really is accurate and I find myself very comfortable using and teaching this way to drill, ream, and even find "true center" of chairs. Creating lines in space is simple and very useful. Try it and let me know what you think.
 I also teach turning which can be useful for things other than just chairmaking. I offer one and two day classes on turning. Learning to sharpen tools correctly and proper geometry is very important. I also sell turning kits for chairs if turning is not your thing. Contact me for details.
 My newest tool addition is this Jet lathe the "1642" which really is smooth and powerful. I will be up-grading my Jet tools in the near future and look forward to trying the newer technology. Notice the two tool rests that allow turning chair legs without moving the tool rest. Later I might weld these together but for now it works great.
Thanks for all those who made 2012 such a great year. This business has allowed me to meet some really interesting people and form new relationships. I look forward to 2013 and traveling the country teaching and meeting new folks. Peace to all.

Thursday, December 20, 2012

Winter and the last day of the world!


  Winter is finally here and I guess the world will end tomorrow which is too bad because I just bought a gallon of milk. I hate waste. I have not posted in a while and I am sorry. Lots of interesting things are going on around the shop. Jet tools chose my shop to shoot videos for a new lathe they are coming out with. Nick Cook came up from Atlanta to set it up. He is a class act guy and really knows turning. It was a lot of fun spending two days with him and the good folks from Jet. I never knew how much it took to shoot a 15 minute video. Look for the video soon. I did my best acting of my career. I think we are going to do more videos on upcoming new tools.

  This is Ziggy and April at the shop each making a chair. They live at the Dancing Rabbit. They build cob homes and teach timber frame workshops. Check out Ziggy's blog "The Year of Mud"


Here is a table I recently finished for a local customer. It is a Nakashima style table out of curly cherry. A nice break from chairs to build something flat for a change. I really like this joinery he uses on his furniture. I would have liked to have met George Nakashima.

I have lots of chairs to build including a high chair, some sack backs, comb backs, and a walnut side table. I also have some classes scheduled. If you haven't done so already check out Kelly Mehler's school which may still have some openings. I'll be helping Peter Galbert and Curtis Buchanan next summer in two different classes. I promise it will be fun. 
For those of you interested in timber framing I'll be constructing a garden tool shed this spring. I'll be cutting the timber very soon. I also plan on cutting all the roof shingles on a new attachment for the saw mill. This is of coarse if the world doesn't end tomorrow.

Stay tuned.


Tuesday, October 2, 2012

Rubber Trees

Nothing puts me in a better mood than wood that splits and bends well. Today was one of those days. It started with two complete failures. True, we don't improve unless we fail first. I had some left over very tight grain white oak trying to bend some hoop back chair backs. These usually do pretty nice but this wood did not comply. My point of failure had to be due to floating the draw knife in and out of growth rings due to the fact that they were so darn close together. Yes, always blame the wood, right? About noon today I called my log guy in Scottsville, Ky. to see if he had the good stuff. He happened to have a yard full of white oaks but a buyer was coming tomorrow to get them all. So me, the trailor, check book in hand were heading north. Mitch, the log guy, has to be the most accommodating human I have ever met. He has never ending patience and the knowledge to help me choose the right log. He even knows the different species and which ones bend the best. "Get the one with the big flaky bark" he says. Loaded and back on the road in 25 minutes only $62 less in my pocket. I couldn't wait so I split the log on the trailor. Right down the middle with no twist. I bet both halves weighed the same. I continued to split until I had that 59'' long back piece for the hoop back. An hour later and I had complete bending bliss. I had found the rubber tree.